Categories
Hardware Music Technology

How to switch the Ableton Push 2 touch strip into Modulation Wheel mode

Hold Select, press touch strip.

The Select button is at the bottom right of the Push 2. Just hold it down, and press the touch strip until the display says “Touchstrip Mode: Modwheel”. To switch it back, do the same until it says “Touchstrip Mode: Pitchbend”. Simple.

I wasted several minutes googling for a textual description of how to make the Push 2’s touch strip act like a mod wheel instead of pitch bend, failing to find one, then having to watch a 5-minute video in order to find out something that could have been described in 5 words. So I created this page in the hope it will save someone else the bother.

Categories
Hardware Technology

How to reset Viewsonic VP181b EEPROM / DVI

I’ve long been searching for the method to reset the EEPROM on my Viewsonic VP-181b 18″ monitor. I bought this monitor second-hand and the DVI input has never worked since I got it. This didn’t matter when I was using it with my PC, but now I want to use it on a Raspberry Pi with an HDMI-to-DVI cable, I’d like to get it working.

Research suggested that doing a factory reset of the EEPROM can sometimes fix a recalcitrant DVI input. Unfortunately it doesn’t seem to have worked for my monitor, so it looks like the circuit is actually fried, but just in case it helps anyone else, here’s how you do it.
I got this info from the Service Manual which I was able to download from here (but only after disabling Adblock Plus).

NB: It seems you need the monitor connected to a VGA input which is displaying something, and have that input selected, because it won’t show the on-screen menus otherwise.

First, put the monitor into “burn-in” mode by holding down the “2” and “down” keys while you switch it on (you can use the front-panel power button, no need to resort to the switch)

Second, switch off again and then go into “factory” mode by holding down the “1” key while you switch on. Factory mode is only accessible once you are already in burn-in mode.

Now when you press the “1” key, you should see a different menu than normal. It looks like this:

Use the down button to select the “Initial EEPROM” option and press 2 to activate.

At this point the EEPROM should be reset, but you are still in burn-in mode – if you switch to the DVI input at this point, you will see a white screen and it will say that you’re in burn-in mode.

To exit burn-in mode, you need to power off, and then power on again while pressing the “down” and “up” keys.

Categories
Hardware Linux Music Product Reviews Technology

Review: Edirol UA-25 24-bit 96kHz 2in 2out USB soundcard

I’ve become quite a fan of this sound device since I got it about a year ago.

For its price, the sound quality is excellent. It’s fairly packed with features, has a good range of options for input and output connectivity, plus MIDI. And it works flawlessly, out of the box, with Linux — no special setup or drivers required, ALSA knows what it is and how to deal with it in any mode.

The same is true of Mac OS, but only in the basic mode which restricts you to 16-bit 44.1kHz I/O – a driver is required for Advance mode to get up to 24-bit 96kHz support (either in, or out – we’ll come to this under Limitations). This driver can be downloaded free from the Edirol website, and seems to work fine on my new unibody Macbook Pro with OSX 10.6 Snow Leopard, though I haven’t used it extensively on there yet.

I guess it probably works in Windows too, but I wouldn’t know anything about that 🙂

The sound quality (for what I’ve used it for anyway) is very good. It’s stacked with features, and quite versatile… within certain limits.

First we’ll take a quick look at the features packed into this gadget, which is information you could probably find elsewhere but I include for ease of reference, and after that we’ll get to discussing those limitations in more detail.

Categories
Hardware Music Technology

M-Audio Xponent Woe – an update

You may have read my generally glowing review of the M-Audio Xponent. I’ve been meaning to update you all with some important news on that front. After I wrote the review, my Xponent developed a fault. I’d had it less than a month, and it had had only fairly light use, maybe 8-10 hours total.

One of the audio channels started cutting out (on both Main and Booth out). Started as just a bit of distortion, then it was really quiet and badly distorted, then it cut out completely. The headphone channel wasn’t affected.

I surmised that this was a bad electrical connection. To test this theory, I did what any self-respecting techie would do: gave it a whack (well, a gentle tap on the side, and then lifting the right-hand side of the unit by about an inch and letting it drop). That did the trick: the sound cut back in, diagnosis confirmed.

Obviously I was mortified that the unit should have such a trivial manufacturing fault (it wasn’t the only one either… I’d already started to uncover some much more subtle and minor problems, like one of the pots being centred at controller value 66 rather than 64). So it was sent back to DV. A month later, repairs were still not done and there was no ETA, so after some argument and quoting of the Sale of Goods Act, DV graciously agreed to a refund.

All of that prompted a reassessment of what I was aiming for with DJing, and whether computer-based mixing would really work for me even if I got a fully working Xponent. Was I happy to be staring at a monitor to mix? No, I do that all day for my day job. Could I imagine taking a laptop and console out to a club every time I play out? No, I’d just worry about it getting nicked, broken, and the hassle of setting it up. Was I content with the quality? Sort of, but in my heart I knew it wasn’t ever going to be as good as a pro quality mixer. If I’m serious about DJing, I might as well do it on the equipment that is already there in every club the length and breadth of the land.

So I decided to invest in Pioneer CDJ1000s and a new mixer after all. That has definitely turned out to be the right choice for me. I’m having a lot more fun now than I was doing it on the computer, and getting professional-quality results that I don’t think I’d have got from the Xponent. All at much higher cost, of course, so it comes down to considering it as an investment rather than an expense. I’m glad I tried out the computer mixing option first, and did it with a console that (manufacturing defects aside), can seriously claim to be the best or one of the best out there. That left me in no doubt that I needed to pursue a different approach, rather than just a different console.

Categories
GUI/X11/Xfree86/Xorg Hardware Linux OS/Software Technology

M-Audio Xponent + Linux + mixxx

Updated: 2007/07/27 – New section on LEDs. Update on mixxx SVN.

In case any of you who have read my review of the M-Audio Xponent are thinking of getting one and wondering “but will it work under Linux?”, the short answer is a resounding Yes!… except for the LEDs, so far. More on that later.

I use Debian unstable with a hand-rolled kernel. YMMV, of course, but the chances are that if you’re using any modern distro you’ll be fine. In fact you may not even have to manually insert the kernel modules if you have a working udev setup, you might just be able to plug’n’play.

Full details below the cut, as they say…

Categories
Hardware Music Product Reviews Technology

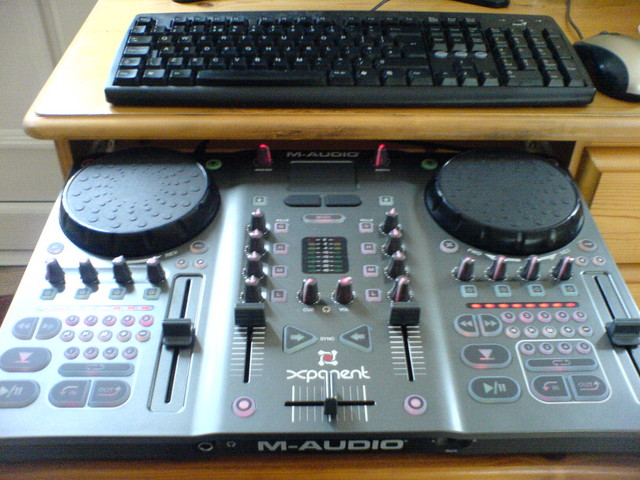
M-Audio Xponent review

M-Audio Xponent

Update: After you’ve read this article, before you rush out and buy one of these, you should read this update (don’t worry, I’ll link to it at the bottom of the page too.

It’s rare for me to suffer from “gear lust” but the M-Audio Xponent set my pulse racing when I discovered it on the web. I’ve now had it for a few days so here’s my review. I won’t be reviewing the Torq software: I haven’t used it, as I only have Linux at the moment.
There’s a separate article about my experience getting the Xponent working with Linux and mixxx.

Review follows: